You must be signed in to read the rest of this article.
Registration on CDEWorld is free. Sign up today!
Forgot your password? Click Here!
Computer-aided design (CAD) software first began to appear in universities in the late 1960s and then developed to serve the engineering needs of aerospace, automotive, and other manufacturing industries. It soon was coupled with computer-aided manufacturing (CAM) programs that drove numerically controlled machine tools. By the early 1970s, commercial CAD/CAM systems were in use.1 As they appeared, a number of individuals began to see the potential for applying similar systems to dentistry. Research unfolded in Europe, Japan, and North America,2,3 and in 1985, the first crown was milled and installed in a mouth, without any laboratory involvement.4
Since then, CAD/CAM and rapid prototyping tools have revolutionized many aspects of dentistry.5 One holdout, however, has been the fabrication of complete dentures. Until recently, denture fabrication has been accomplished in a complex series of exclusively analog operations that are both time-consuming and error-prone.6 The process has remained substantially unchanged despite increasing demand for both new and replacement dentures. The 65 and older age group is the fastest growing one in the United States, expected to double by 2030. The partially edentulous population is projected to grow to 200 million,7-9 while some 75% of existing dentures are due for replacement, based on a 7-year life cycle.
The recent introduction of digital denture-fabrication products has finally begun to change that. Such products use CAD design and rapid prototyping tools to produce extremely accurate dentures twice as fast as conventional processes. Digital dentures require only two to three office visits, rather than the traditional five or more, and each visit consumes less chairtime (typically less than 45 minutes). The digital approach furthermore enables the try-in of a prototype denture that closely approximates the final denture design. This prototype can be refined, if necessary, ensuring a very high level of fit and function of the final product.
Pala Digital Dentures (Heraeus Kulzer) is one of the recently introduced digital denture systems. Other digital denture systems that are available to choose from include AvaDent Digital Dentures (Global Dental Science) and DENTCA CAD/CAM Denture (DENTCA, Inc.), in addition to digital design systems such as Denture Design™ (3Shape). Key aspects of the workflow when using the Pala system are explained as follows.
At the first visit, the dentist selects an appropriately sized impression tray from the Pala Digital Dentures kit. Four standard sizes are available, and heat can be used to modify the shape of a tray, if minor modification is necessary. Impressions are then made using scannable heavy- and light-body impression materials. The posterior portion of each impression is then removed, and a central bearing device is attached that enables capture of the vertical dimension and Gothic arch tracing for the centric relation record. A bite registration is made and, using a lip ruler, the upper lip length is measured. These materials are sent to the dental laboratory.
A laboratory technician scans the impressions and uses software that incorporates both specialized algorithms and anthropometric data gathered from a large cross-section of patients. The 3D model of the new denture is designed, taking into consideration 26 anatomical landmarks captured in the impressions. The software calculates the optimal midline, occlusal plane, curve of Spee, curve of Wilson, articulation, and posterior palatal dam, and it selects the teeth. It identifies the hamular notch and frenum to achieve an excellent seal and fit.
Once the set-up has been completed, the dentist and laboratory technician together can evaluate the 3D denture model. The dentist may wish to refine the design at this point; for example, subtly rotating some of the anterior teeth to achieve a more natural appearance or adjusting the occlusion.
When the dentist is satisfied with the virtual set-up, a rapid prototype of the denture is printed. This try-in denture is sent to the dentist.
At the try-in visit, the prototype denture is inserted, and all aspects of its function and appearance are evaluated. Anything less than optimal is noted, and the try-in is sent back for modification. If the required change is substantial, an entirely new try-in may be requested, though this is only rarely necessary. Once the try-in has been perfected, the final denture is fabricated by Heraeus using a proprietary process.
Case Report
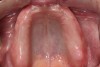
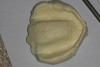
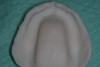
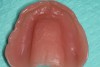
The patient was a 70-year-old man who worked as a dental laboratory technician. He presented because his long-standing maxillary denture was worn and had become ill-fitting. In the mandible, he wore a partial denture. A plan was developed to restore his edentulous maxilla (Figure 1) with a new denture that was digitally designed and fabricated using CAD/CAM technology.
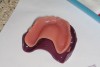
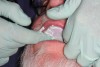
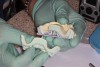
At the first appointment, a medium-size tray was selected, after using the old denture to approximate the size required (Figure 2). Heavy-body impression material was injected into the tray, which was then positioned on the patient’s upper arch (Figure 3). Although the impression tray lacks a handle because its presence might create some distortion, finger rests designed into the posterior portion of the tray can be used to ensure the tray is fully seated.
The patient was then guided through a series of border-molding procedures. He was instructed to open his mouth wide and then close it and to move his jaw side-to-side. Each cheek in turn was pulled out and down, and then the lip was gently pulled downward and forward, to identify the anterior frenum and form the buccal frenum and vestibular sulcus. He also was asked to swallow and cough, causing the soft palate to migrate to its natural anterior functional position, thereby facilitating an ideal post-palatal zone. These movements were repeated three to four times, until the impression material was completely set.
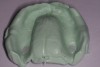
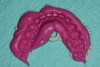
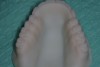
After the heavy-body material set, the impression (Figure 4) was inspected to confirm that all the significant landmarks were duplicated (the post-dam area, hamular notch, palatine fovea, incisive foramen, and the frenum areas). In several areas, the tray showed through, so an acrylic bur was used to relieve each of the exposed areas, in effect customizing the tray.
Light-body polyvinyl siloxane wash material was then injected, the impression was reseated, and the same excursion process was repeated. The completed wash impression was highly satisfactory (Figure 5). However, had any problem areas been evident, it would have been possible to make an adjustment and re-wash or take a new impression altogether.
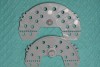
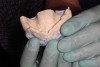
The next step was to separate the posterior portion of the tray to enable obtaining an accurate vertical dimension without any obstruction. The Pala system’s impression trays are designed to facilitate removal of the posterior. The separation is accomplished using a scalpel to cut through the impression material and tray; the material detaches easily (Figure 6 and Figure 7). Before doing this, it can be helpful to clean off any excess impression material or even inspect an unused tray so that the scalpel can be best directed to the separation joint.
The separated posterior portion is retained to send to the dental laboratory along with the other materials, as the laboratory technician will consequently rejoin it before scanning the impression.
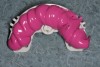
To register the bite when making single-arch dentures, the Pala system provides a special device to be positioned against the opposing dentition (Figure 8). This device can be used in either arch.
The proper sized device was selected and filled with impression material (Figure 9A through Figure 9C). It was placed on the teeth, seating easily (Figure 10). The pin was then turned to adjust its height. Each turn changes the height by one millimeter. In some cases, it may be preferable to remove the bottom of the pin before making the fine adjustments.
The pin was gently rotated clockwise until the patient’s lips naturally touched each other without any force or tension. Once the vertical dimension of occlusion was determined, the centric-relation position was identified by having the patient move his jaw forward and back several times to determine the most posterior position. Bite-registration material was then injected in between the upper impression and the lower device. After it set, the entire assembly was removed from the patient’s mouth (Figure 11).
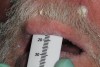
The final step of this first appointment was to place the lip ruler on the notch of the patient’s frenum and measure the length from the incisal papilla to the upper lip line. A photograph was taken of the ruler in position (Figure 12), and this was sent to the laboratory, along with the impressions, bite registration, and prescription form.
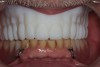
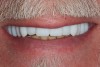
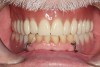
At the laboratory, the denture was designed, and a rapid prototype of the design was printed (Figure 13 and Figure 14). The patient returned, and the prototype was tried in (Figure 15 and Figure 16). Although use of an all-white try-in has the drawback of lacking a natural appearance, most patients can be guided to imagine what the ultimate colors will look like.
At the try-in appointment, the fit, bite, and denture appearance all were carefully evaluated. While the fit and the bite were excellent, the patient felt that the appearance of the denture was a little too perfect. A decision was thus made to slightly rotate the right lateral incisor to achieve a more natural appearance. Changes such as these can be communicated to the dental laboratory in a number of ways: in writing, by adjusting the try-in, drawing on the try-in, or even taking a screen shot and making the changes virtually.
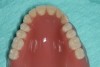
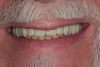
The final denture (Figure 17 and Figure 18) was returned to the restorative dentist about 2 weeks after the try-in appointment. When patient returned for delivery of the denture (Figure 19 through Figure 21), he expressed complete satisfaction with both the fit and appearance. No adjustment was required to compensate for sore spots. In general, the author has found that delivery of the digital dentures is faster than when using a conventional fabrication process.
Discussion
Complete edentulism often carries with it many negative emotional effects. These can include feelings of bereavement, loss of self-confidence, a negative self image, behavioral changes that conceal the tooth loss and let the person avoid social situations, and premature aging.10 While traditional dentures counteract some of the problems of edentulism, the process of fabricating them has long been time-consuming and challenging. Various inaccuracies inherent in the process may result in a poor fit, porous composition prone to staining and odor, improper occlusal schemes, and unesthetic tooth shapes and arrangements.11,12 In the traditional denture-fabrication process, the master cast and master impression are poured for making a base plate that is molded to the impression. Placed on top of this, the wax rim does not feel or fit like the final denture will.
The digital denture approach represents a significant change. The ability to perform a virtual wax-up by setting and moving the denture teeth on a computer makes it possible for the dentist and dental laboratory technician to collaborate early in the fabrication process. The prototype denture that can be fabricated from this virtual wax-up much more closely approximates how the final dentures will fit and function. As a result, the try-in process is easier and more accurate, and it requires less time.
The time savings resulting from the digital denture approach—reducing the number of required office visits typically from five or more to three—may be the most important benefit. However, another major benefit is that the digital data can easily be retained for future use. If a denture is lost, as is likely to occur in some elderly populations, a replacement denture can be fabricated without the need for any office visits. Previous dentures can be modified, if necessary. Some practitioners have begun to routinely supply patients with a spare denture, because this is achieved so easily.13
For all these reasons, digital dentures promise to have a major impact on both treatment strategies, and consequently, on patients’ lives.
References
1. Erdman AG, Riley DR. Computer-aided design and manufacturing–CAD/CAM. In: Mechanical Design and Systems Handbook. Rothbard HA (ed.) McGraw Hill; 1985.
2. Rekow ED. CAD/CAM in dentistry: a historical perspective and view of the future. J Can Dent Assoc. 1992;58(4):283-288.
3. Duret F, Blouin J-L, Duret B. CAD-CAM in dentistry. J Am Dent Assoc. 1988;117:715-720.
4. Duret F, et al. Realisation d’une couronne par ordinateur. Congres A.D.F., Paris; 25 November 1985.
5. Fuster-Torres MA, Albalat-Estela S, Alcaniz-Raya M, Penarrocha-Diago M. CAD/CAM dental systems in implant dentistry: update. Med Oral Patol Oral Cir Bucal. 2009;14(3):E141-E145.
6. Rudd RW, Rudd KD. A review of 243 errors possible during the fabrication of a removable partial denture. J Prosthet Dent. 2001;86(3):251-261.
7. National Center for Health Statistics. Health, United States, 2011: With special feature on socioeconomic status and health. Hyattsville, MD. 2012.
8. US Census Bureau. US interim projections by age, sex, race, and Hispanic origin: 2000–2050. Suitland, MD: US Census Bureau Population Division; 2004.
9. Douglass CW, Shih A, Ostry L. Will there be a need for complete dentures in the United States in 2020? J Prosthet Dent. 2001;86(3):251-261.
10. Fiske J, Davis DM, Frances C, Gelbier S. The emotional effects of tooth loss in edentulous people. Br Dent J. 1998;184:90-93.
11. Li W, Yuan F, Lv P, et al. Evaluation of the quantitative accuracy of 3D reconstruction of edentulous jaw models with jaw relation based on reference point system alignment. PLoS One. 2015;10(2):e0117320. doi: 10.1371/journal.pone.0117320. eCollection 2015.
12. Infante L, Yilmaz B, McGlumphy E, Finger L. Fabricating complete dentures with CAD/CAM technology. J Prosthet Dent. 2014;111(5):351-355.
13. Bidra AS, Taylor TD, Agar JR. Computer-aided technology for fabricating complete dentures: systematic review of historical background, current status, and future perspectives. J Prosthet Dent. 2013;109(6):361-366.